How to create an image slider using JavaScript
An "Image Slider" that comprises several images displayed on a web application is called “Slide Show” and “Carousels”. It permits you to show multiple images, videos, or graphics on a web application. Also, adding an Image Slider to a website can fascinate the users and capture their attention.
Being a JavaScript developer, if you are asked to create an image slider for a web application, you will quickly think about employing “jQuery Plugins“. These plugins are helpful; however, they may encounter code conflicts with existing libraries and jQuery libraries. So, what to do in this scenario? Instead of using jQuery, utilize JavaScript and create an image slider without hassle.
This write-up will teach the procedure of creating an image slider in JavaScript. So, let’s start!
How to create an image slider using JavaScript
To create an image slider using JavaScript, you have to follow the below-given instructions:
Step 1: Upload desired images to the project folder.
Step 2: Add required HTML elements to the “index.html” file.
Step 3: Define logic in the JavaScript file.
Step 4: Set the style of the added HTML element in the “style.css” file.
According to the mentioned steps, we will now go through the procedure of creating an image slider using JavaScript.
Note: For the demonstration purpose, we are using Visual Studio Code. However, you can utilize any code editor of your choice.
Step 1: Upload desired images to the project
In your project, create a new folder named “images” and add the desired images to it for which you want to create an image slider.
For instance, in our “IMAGE SLIDER” project folder, we have created an “images” folder and then added three images to it: “img1.jpg”, “img2.jpg”, and “img3.jpg”:

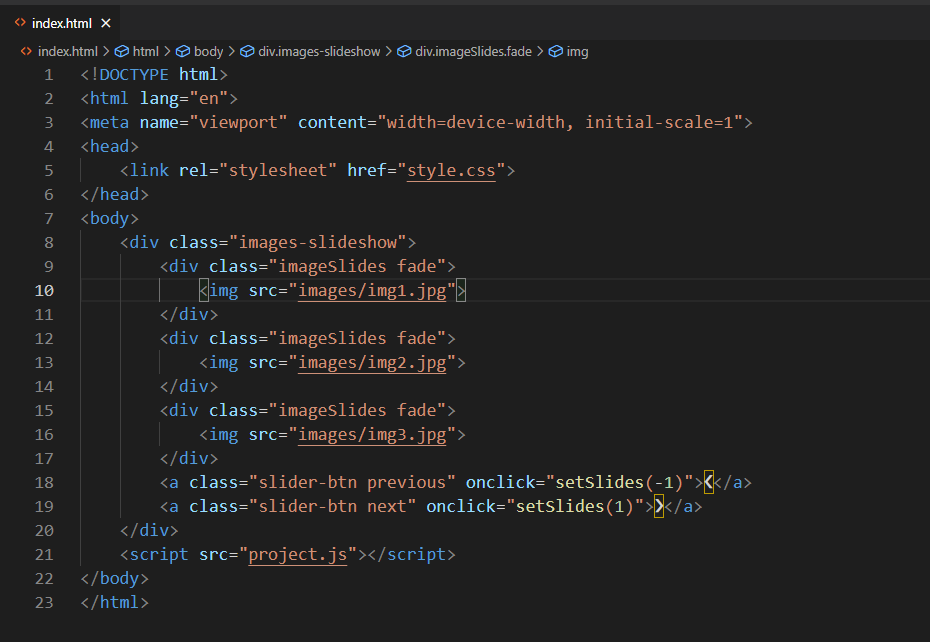
Step 2: Add required HTML elements to the “index.html” file
In the “index.html” file, we will add a container “images-slideshow” using the “<div>” tag. This container is further divided into the three image slides sections.
Along with the specified images slides, we will also add two HTML symbols with the help of the “<a>” anchor tag. The “<” symbol will take us to the “previous” slide, whereas the second symbol “>” slides to the “next” image:
<div class="images-slideshow">
<div class="imageSlides fade">
<img src="images/img1.jpg">
</div>
<div class="imageSlides fade">
<img src="images/img2.jpg">
</div>
<div class="imageSlides fade">
<img src="images/img3.jpg">
</div>
<a class="slider-btn previous" onclick="setSlides(-1)">❮</a>
<a class="slider-btn next" onclick="setSlides(1)">❯</a>
</div>
<div class="imageSlides fade">
<img src="images/img1.jpg">
</div>
<div class="imageSlides fade">
<img src="images/img2.jpg">
</div>
<div class="imageSlides fade">
<img src="images/img3.jpg">
</div>
<a class="slider-btn previous" onclick="setSlides(-1)">❮</a>
<a class="slider-btn next" onclick="setSlides(1)">❯</a>
</div>
Here is how our "index.html" file looks like:
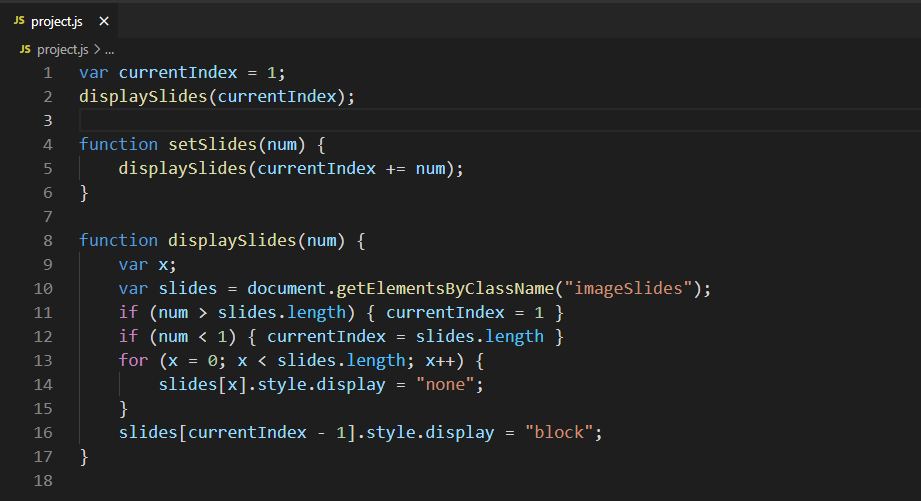
Step 3: Define logic in the JavaScript file
We have to define logic in the “project.js” file in such a way that when the image slider gets loaded for the first time, it shows the first image on the slider. After that, it permits us to move between the slides by utilizing the next and previous HTML symbols.
To do so, firstly, we will set “1” as the “currentIndex” of slides and pass it to the “displaySlides()” function:
var currentIndex = 1;
displaySlides(currentIndex);
displaySlides(currentIndex);
The “displaySlides()” function accepts the “currentIndex” value as an argument “num”. In the first step, this function fetches all of the elements with the class name “imageSlides”.
Then, we will add an “if” condition “num > slides.length” that checks if the value of the “num” argument is greater than the length of the slides “3”. Note that the “num” value refers to the “currentIndex” of the slides. In case, if the specified condition evaluates as “truthy”, the “currentIndex” of the slider will be set to “1”. This condition will be applied in the situation where the last image (slide 3) is displayed and the user clicks the “next” button. Upon doing so, the slider will set the “first” image (slide 1) on the slideshow.
Similarly, the second “if” condition “num < 1 “ will be evaluated as true, when the first image (slide 1) is displayed on the slideshow and the user clicks the “previous” button. In this case, the value of the “currentIndex” is set as “3” which equals the slider “length” and the last image (slide 3) will be shown on the slideshow.
Also, when a slide is selected to display using its “currentIndex”, the display of the other two slides’ style will be set to “none”:
function displaySlides(num) {
var x;
var slides = document.getElementsByClassName("imageSlides");
if (num > slides.length) { currentIndex = 1 }
if (num < 1) { currentIndex = slides.length }
for (x = 0; x < slides.length; x++) {
slides[x].style.display = "none";
}
slides[currentIndex - 1].style.display = "block";
}
var x;
var slides = document.getElementsByClassName("imageSlides");
if (num > slides.length) { currentIndex = 1 }
if (num < 1) { currentIndex = slides.length }
for (x = 0; x < slides.length; x++) {
slides[x].style.display = "none";
}
slides[currentIndex - 1].style.display = "block";
}
On the Image slider, when we click on the (next) “>” HTML symbol, “1” is passed as an argument to the “setSlides()” function which signifies that the slider has to move to the next slide. For this purpose, the “setSlides()” invokes “displaySlides()” function while passing “currentIndex += num” as an argument. This operation will increment “1” in the “currentIndex” value and then show that specific image on the slideshow.
In the other case, when (previous) “<” symbol is clicked, a “-1” value is passed to the “displaySlides()” method for displaying the previous image on the slider:
function setSlides(num) {
displaySlides(currentIndex += num);
}
displaySlides(currentIndex += num);
}
Step 4: Set the style of the added HTML element in the “style.css” file
Next, add the below-given code in the “style.css” file to specify the style of the added HTML elements:
// CODE
.imageSlides {
display: none
}
img {
margin: auto;
display: block;
width: 100%;
}
/* Our main images-slideshow container */
.images-slideshow {
max-width: 612px;
position: relative;
margin: auto;
}
/*Style for ">" next and "<" previous buttons */
.slider-btn{
cursor: pointer;
position: absolute;
top: 50%;
width: auto;
padding: 8px 16px;
margin-top: -22px;
color: rgb(0, 0, 0);
font-weight: bold;
font-size: 18px;
transition: 0.6s ease;
border-radius: 0 3px 3px 0;
user-select: none;
background-color: rgba(255, 255, 255, 0.5);
border-radius: 50%;
}
/* setting the position of the previous button towards left */
.previous {
left: 2%;
}
/* setting the position of the next button towards right */
.next {
right: 2%;
}
/* On hover, adding a background color */
.previous:hover,
.next:hover {
color: rgb(255, 253, 253);
background-color: rgba(0, 0, 0, 0.8);
}
//CODE
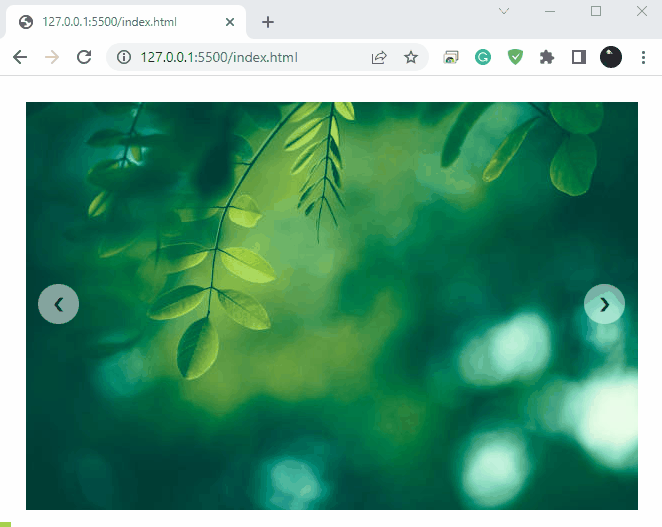
After saving the added code, open up the “index.html” file in the browser and check out the working of created Image Slider:
Comments
Post a Comment